Using Dialogs for Multiple Entities in Microsoft Dynamics CRM

Over the past few years, Microsoft Dynamics CRM has become a popular enterprise tool for solving complex tasks. To implement various scenarios developers often use plug-ins, dialogues and workflows, but sometimes these out-of-the-box tools can’t provide the functionality needed.
In this article, we’ll consider using dialogues for multiple entities and implement a sample task where we’ll have customers with invoices. The task itself is to increase the invoice discount by some value for all selected customers.
We can’t use a workflow approach in a standard dialogue as it will be hard to retrieve the references to customers’ invoices, and it has to be done for each individual customer. We could use custom workflow activities, but in this case, it would be hard to enter some procedure parameters (in our case it will be the amount by which the invoice discount must be increased). Using only JavaScript will cause lots of problems connected to transactions and integrity of the procedure. So, we will need to use some combination of different Dynamics CRM coding approaches, namely, we’ll pair JavaScript with plug-ins functionality. Microsoft provides an opportunity for developers to extend and modify Dynamics CRM using .NET assemblies with code that can be triggered by some events (such as entity creation, modification or deletion). These assemblies are called plug-ins.
We are going to solve this problem by using JavaScript to gather primary data (selected customers), dialogues to collect additional data (amount to increase/decrease the discount by), and plug-ins to process all the data. We will create a .NET assembly and register it in CRM to enhance standard logic.
First of all, let’s look at the concept:
- For ribbon editing (creating a button for action) we’ll be using Ribbon Workbench.
- To collect the selected customers IDs and pass them to the dialog and plug-in we will use custom entities, which will store IDs of customers and one parent entity for them to store data entered in the dialog. Entities with IDs will be connected to the parent entity.
- Dialogue will have these actions:
- prompt user to enter required values;
- update parent entity with data entered by the user via dialogue (the update will trigger plug-in execution).
- Plug-in will read the data from parent entities and associated entities with customer IDs and process customers’ invoices. Usage of C# language in the plug-in will give us an opportunity to create a complex logic and integrate it into CRM. CRM 2011 SDK provides .NET the assemblies needed to work with the data stored in any entity.
Preparing CRM entities
So, first things first: let’s create new entities for processing and add existing required entities to a solution. To do this, go to solution components, add a new entity and fill the form as shown in Picture 1 (other entity options are not important right now). For testing purposes, we will display this entity in the Settings Area.
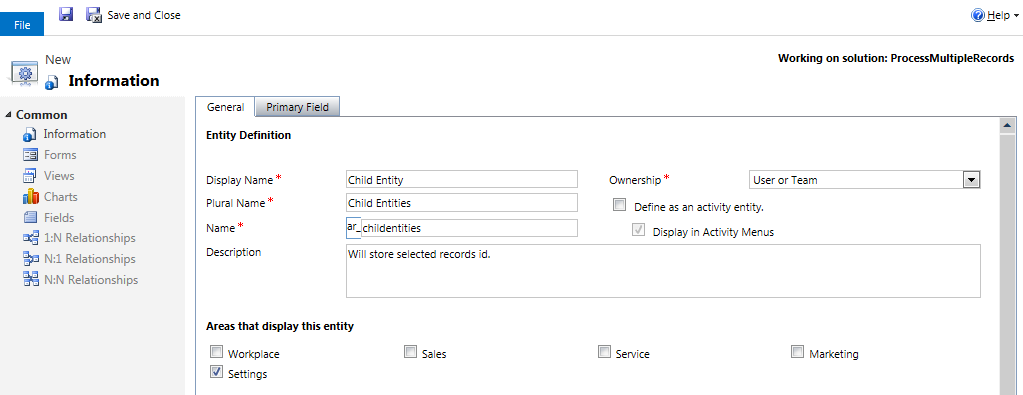
Add these fields to our new entity:
- Contact
- Name: ar_contact
- Type: Lookup
- Target Record Type: Contact
- Parent Entity
- Name: ar_parententity
- Type: Lookup
- Target Record Type: Parent Entity
Now do the same for the parent entity:
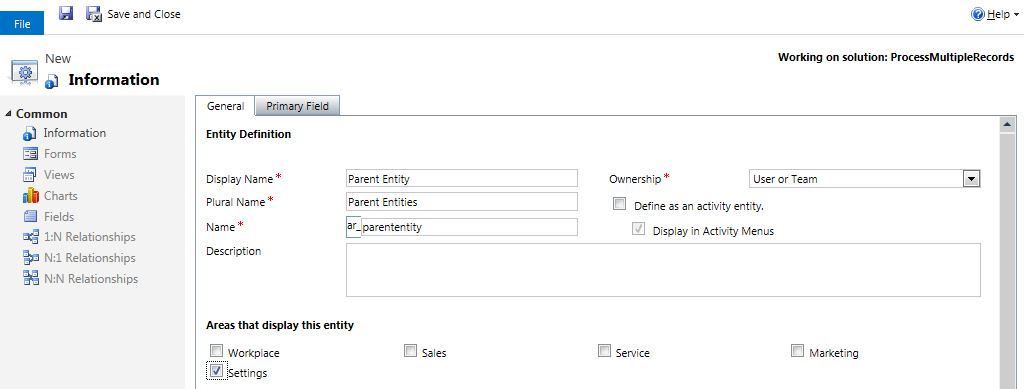
Fields:
- Amount:
- Name: ar_amount
- Type: Currency
Note that entity names can be different: prefix can differentiate in different solutions.
Also, to create a button for customers, add a Contact entity to the solution.
Creating dialogue for user interaction
The next step is to create a dialogue for Parent entity for user interaction with our process. Go to solution components and add new Process. Fill the form with data provided in Picture 3 and press OK.
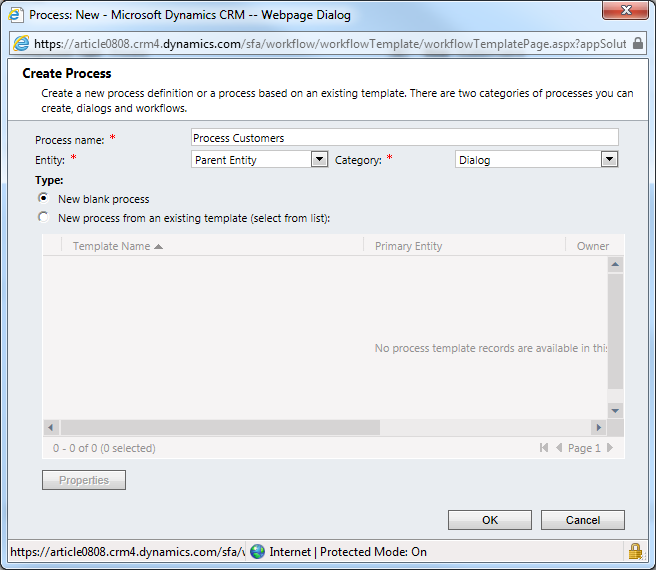
You should see the Dialog designer form:
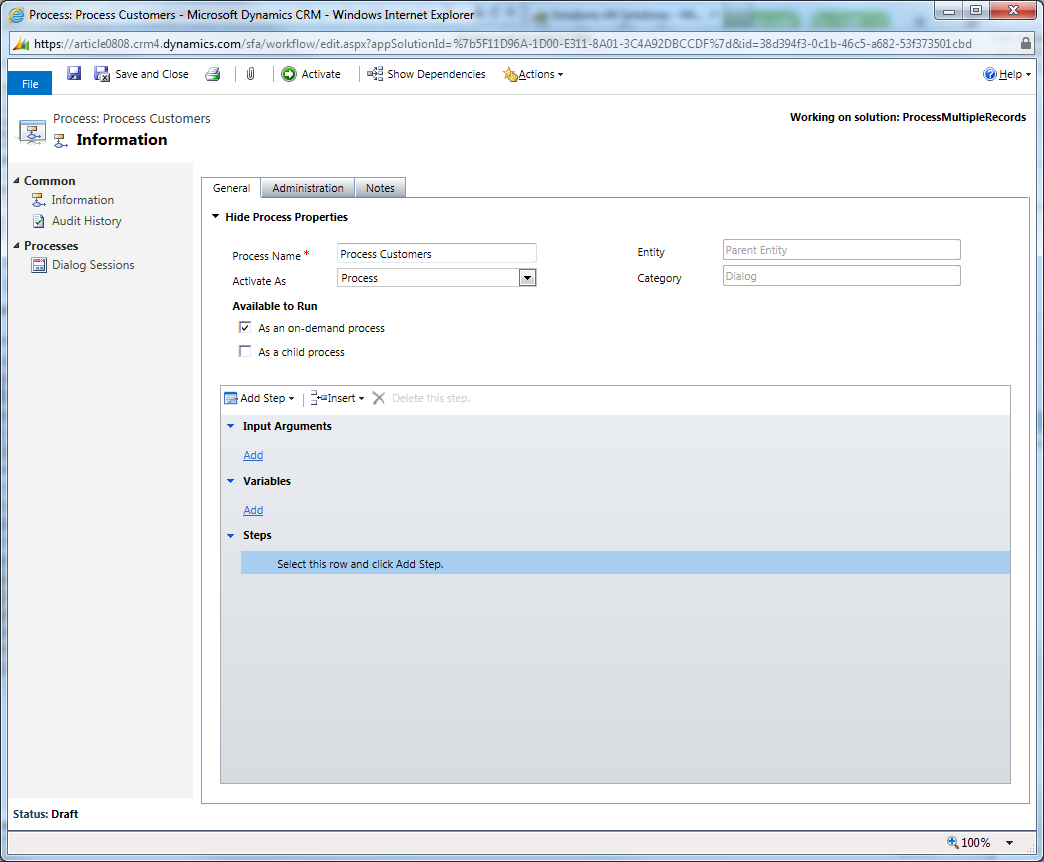
Click the Select this row and click Add Step field and add a new Page step:
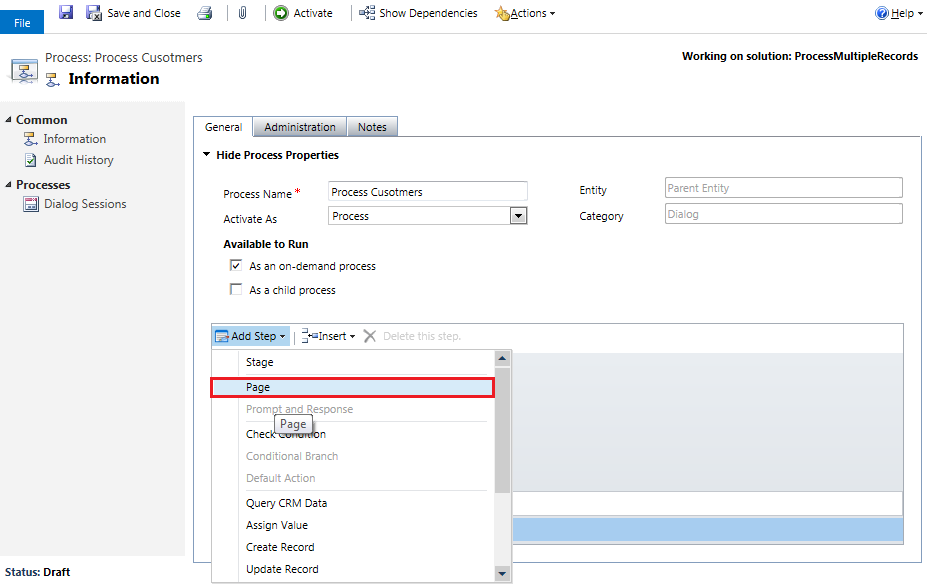
Select the row in the page step, add the new step Prompt and Response and click Set Properties:


Fill in the form as shown below, then save and close it:
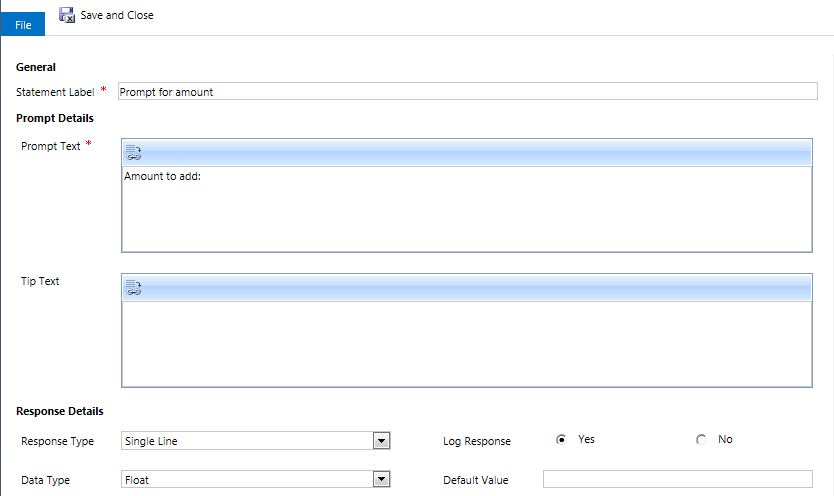
In the Process creation window select Page step and add the new step — Update Record, then select Set Properties:
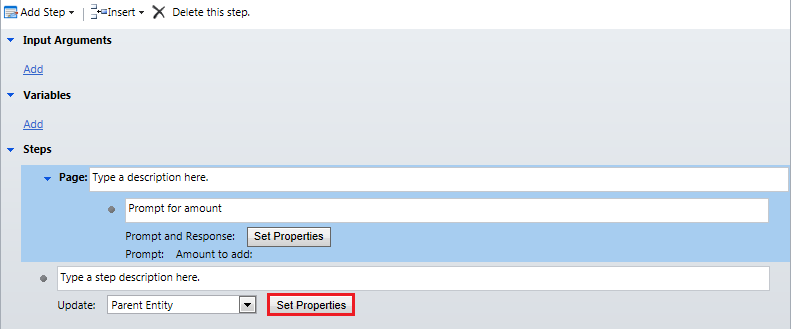
Now we need to fill in the Amount field. To do this, place the cursor in the Amount field by clicking on the textbox and then select Prompt for an amount in Look for dropdown and Response text in the dropdown below, click the Add button and then OK in Form Assistant pane. You should see the form shown in the picture below with the filled Amount field. Press the Save and Close button.
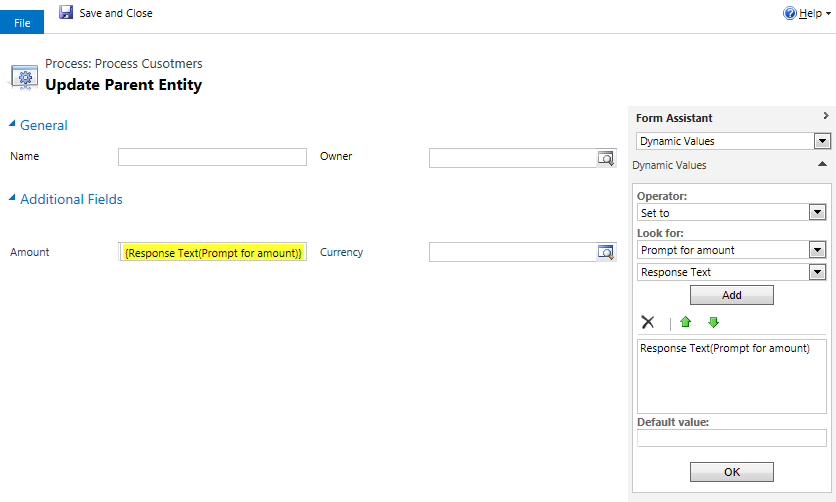
OK, dialogue steps are prepared now. To publish the dialogue press the Activate button at the top of the page and confirm activation in the Confirmation dialogue. The dialogue is ready to use.
Creating JavaScript code for starting a dialogue
The next step will be to write a JavaScript library to create a Parent entity, list of Child entities, attach them to the Parent entity, and then open the dialogue that we have created.
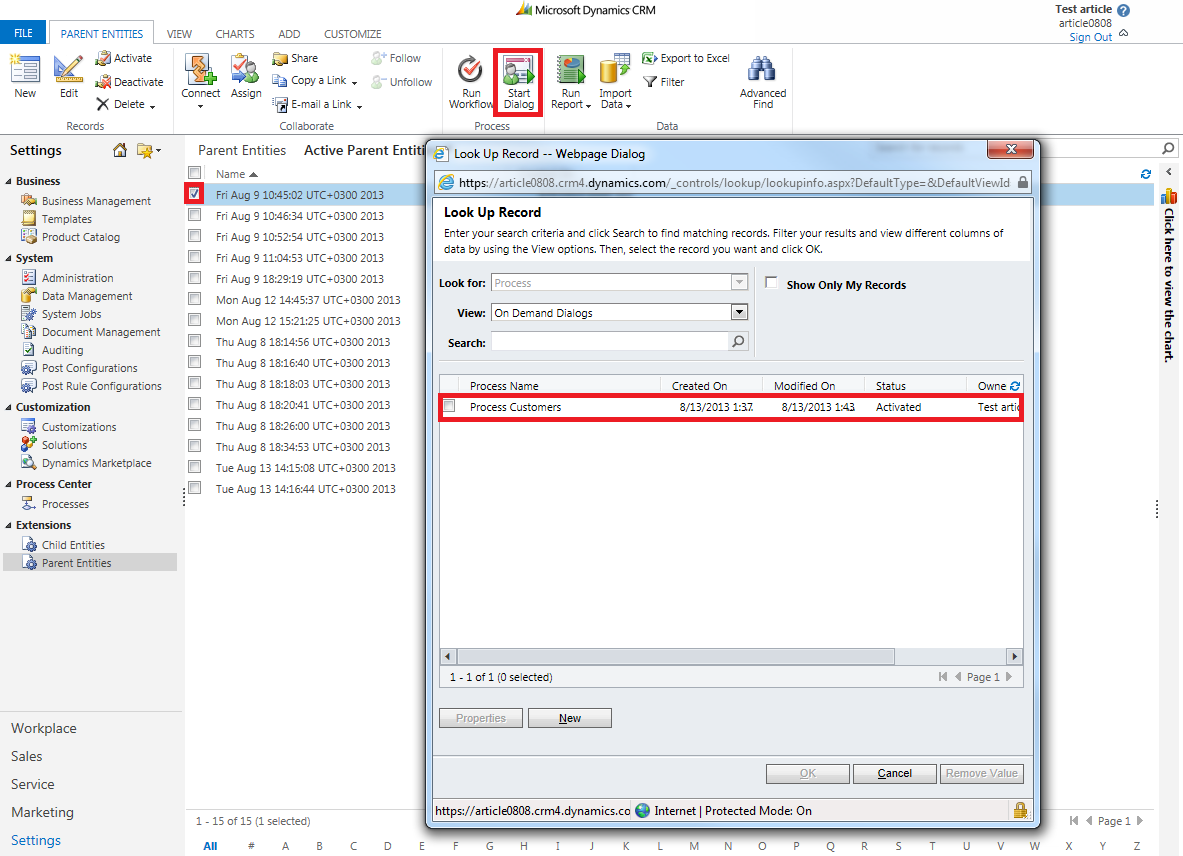
The first thing we need is to get dialogue ID to start it over CRM API. This is how you can obtain it: go to Parent Entity view, select one record (create some with any data, if none exists), click Start Dialog button in ribbon panel and select the Process Customers dialogue.
We will use CRM REST Endpoint with JavaScript. More info on using REST Endpoint can be found here (documentation) and here (samples). SDK library (SDK.JQuery.js) can be found at or in the SDK installation folder, at SampleCode\ JS\RESTEndpoint\ JQueryRESTDataOperations (without spaces).
Here’s the JavaScript code (process.js):
var dialogId = "38D394F3-0C1B-46C5-A682-53F373501CBD";
var parentEntityLogicalName = "ar_parententity";

function Process(items) {
    if (items.length != 0) {
        var parentEntity = {};
        var parentEntityId;
        var parentEntityName;

        // Creating parent entity with some name
        parentEntity.ar_name = (new Date()).toString();
        SDK.JQuery.createRecord(
            parentEntity,
            parentEntityLogicalName,
            // call back from parent entity creating
            function (entity) {
                // saving parent entity id and name
                parentEntityId = entity.ar_parententityId;
                parentEntityName = entity.ar_name;

                // creating child entities
                for (var i = 0; i < items.length; i++) {
                    var childEntity = {};
                    childEntity.ar_name = (new Date()).toString();
                    // setting ParentEntity field to assotiate child entity with parent
                    childEntity.ar_ParentEntity = { Id: parentEntityId, LogicalName: parentEntityLogicalName, Name: parentEntityName };
                    // storing customer in child entity using the reference to customer
                    childEntity.ar_Customer = { Id: items[i].toString(), LogicalName: parentEntityLogicalName };
                    // creating record
                    SDK.JQuery.createRecord(
                        childEntity,
                        "ar_childentity",
                        function(chEntity) {},
                        errorHandler
                    );
                }

                // we didn't wait until all children will be created so starting dialog immediately after parent entity is created
                var serverUri = Mscrm.CrmUri.create('/cs/dialog/rundialog.aspx');
                window.showModalDialog(serverUri + '?DialogId=' + "%7b" + dialogId + "%7d" + '&EntityName=' + parentEntityLogicalName + '&ObjectId=' + parentEntityId,
                                null, 'dialogWidth: 615px; dialogHeight: 480px; resizable: yes; status: yes, scrollbars:yes;');
            },
            errorHandler
        );
    } else {
        alert("No records selected");
    }
}

function errorHandler(error) {
    alert(error.message);
}
Publishing JavaScript
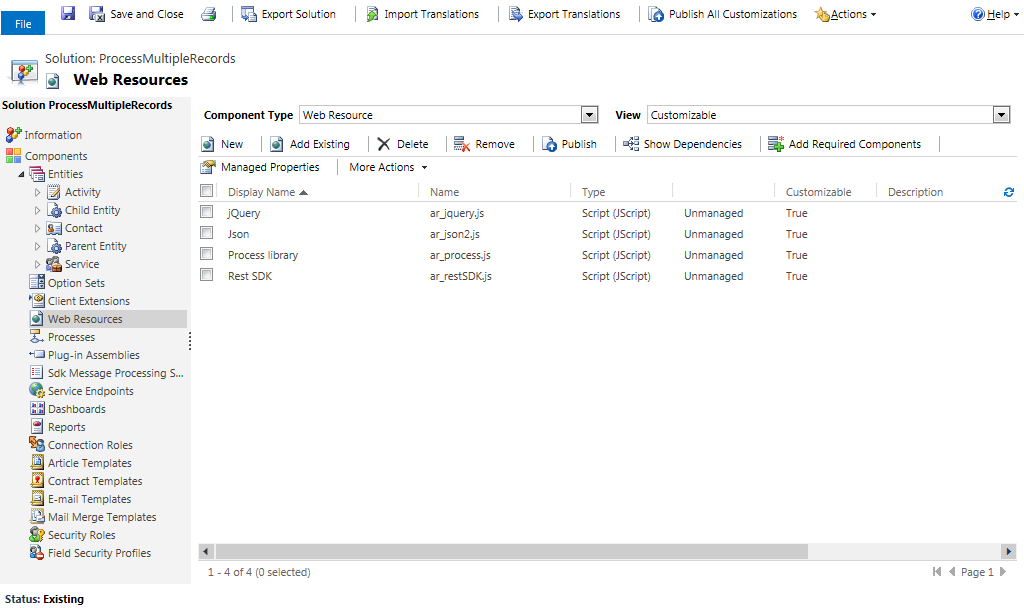
To make the provided JavaScript code sample work some additional libraries have to be uploaded to CRM and published:
- jQuery.js
- json2.js
- restSDK.js
All of them can be found in the CRM 2011 SDK samples code or in the solution provided. Don’t forget to upload our library and name it process.js.
After libraries upload the Web Resources tab should look as in picture 11 below:
Creating a button
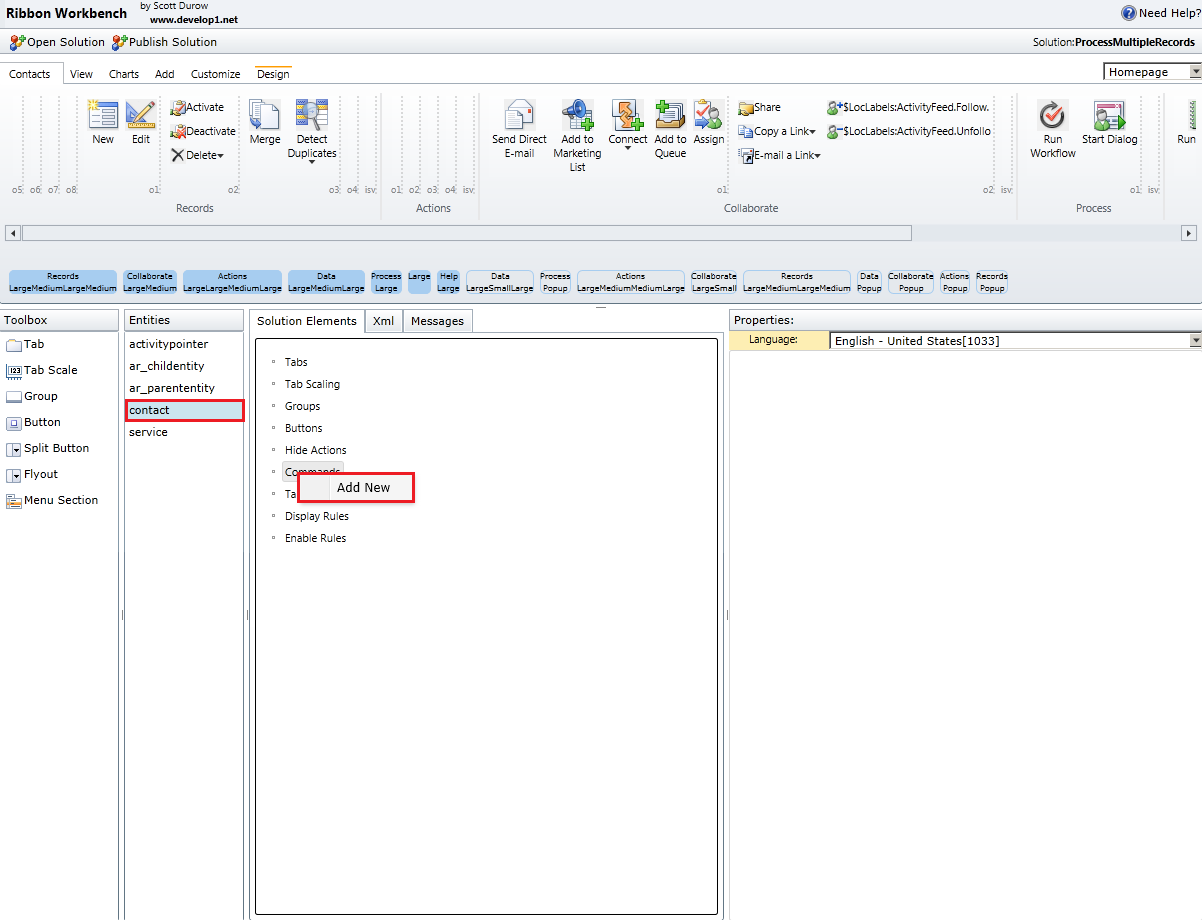
Before creating a button ensure that Contact entity is included in your solution and install the Ribbon Workbench solution on your CRM system. Open the application by clicking the Ribbon Workbench button in the Customizations menu. Select your solution and click OK. Workbench will load the solution and show all the entities that belong to it with their ribbon panels.
In the Entities panel select contact from the Entities column, then in Solution elements right-click Commands and click Add New: a new command will be created.
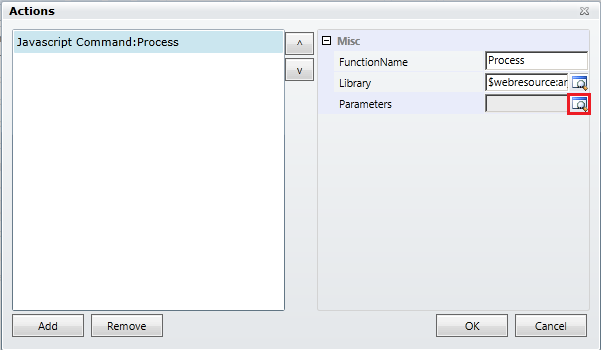
Now we need to add our JavaScript function to this command. Right-click on command and select Edit Actions. In a dialogue click Add, select Javascript Function Action and click OK. In the right panel type in the FunctionName, which in our case will be Process. Select library, Process library in our case. Open the Parameters dialogue by clicking the button located near Parameters textbox.
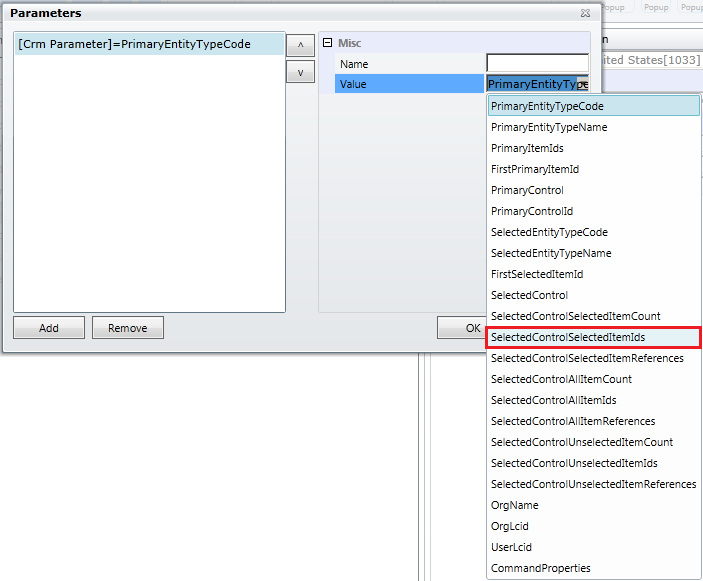
Click Add, in a dialogue that opens select Crm Parameter. Name it items (naming is optional). In the Value dropdown select SelectedControlSelectedItemIds and click OK to close the Parameters dialogue.
Now let’s load other libraries into the Contact view. There are different ways to do that (see here). В We’ll just add the scripts to actions on button click. In the Actions dialogue add new Javascript Function Action with FunctionName $ and jQuery library without any parameters, then do the same for JSON library, and then once again for Rest SDK with FunctionName isNaN. Use Up and Down Arrows to move jQuery, JSON and SDK libraries higher in the list and load them before the execution of our script. After that your Actions window should look like this (Picture 15):
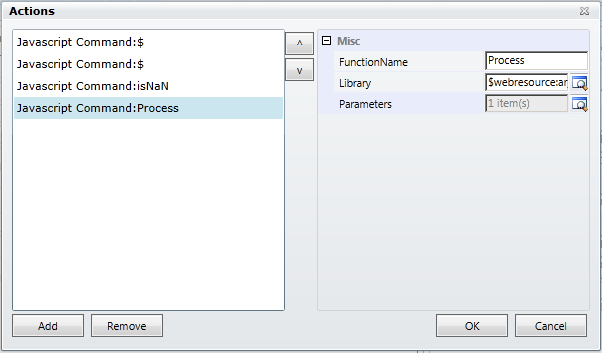
Click OK to save added actions.
Next step is to create a button: drag and drop the button item from Toolbox to any place you want (we placed it in the Process group after Start Dialog button), make sure you have selected the contact entity and Homepage from the top right dropdown menu. Fill the LabelText field in button properties and select the command that we have created earlier.
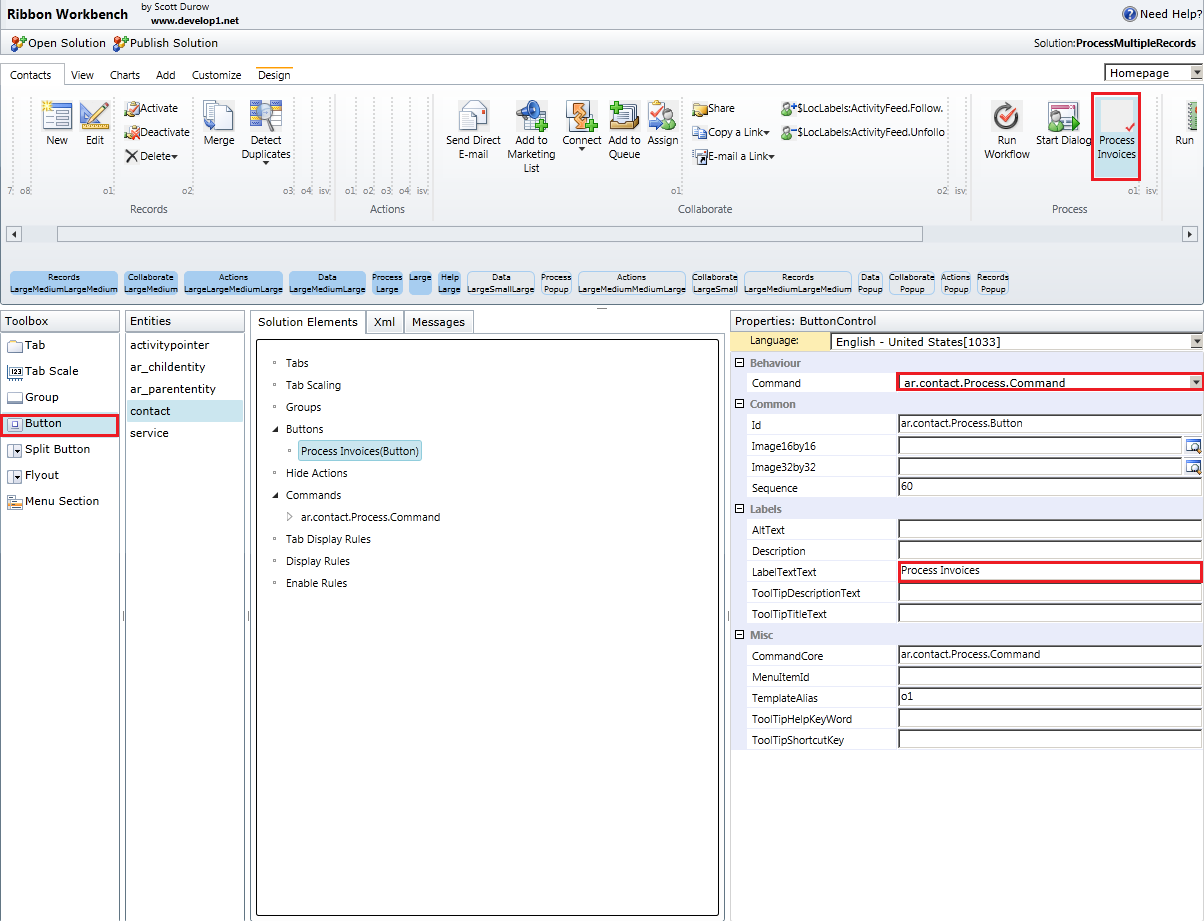
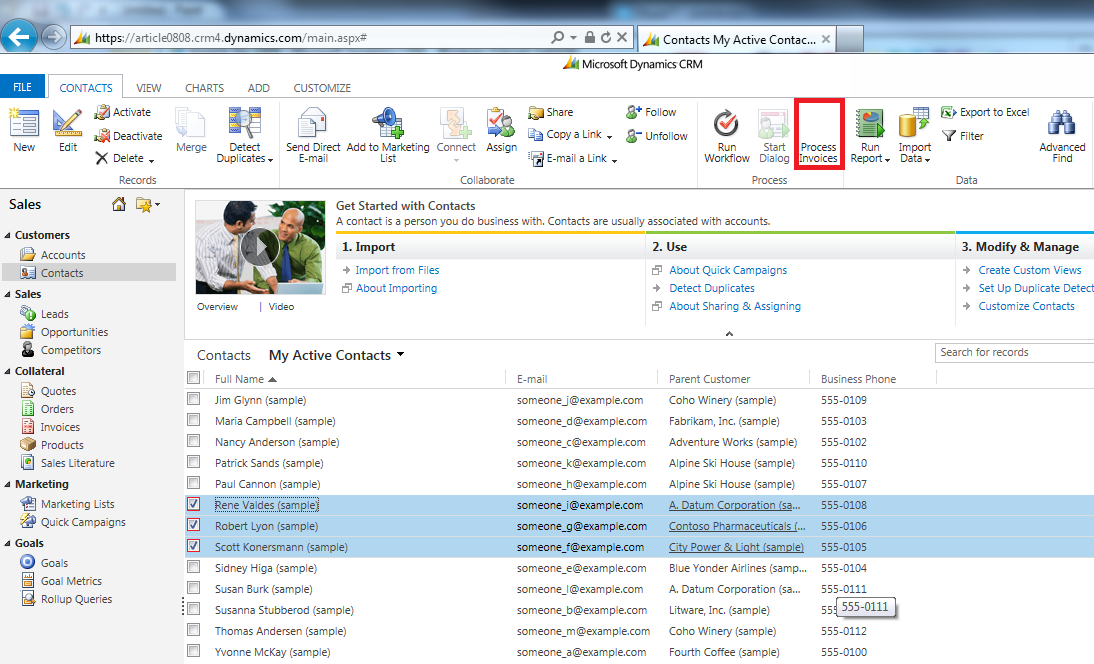
After that click Publish Solution and wait until the process completes. Now you can go to Customers->Contacts page, select contacts and click the new Process Invoices button (refresh the page if it doesn’t show up). This will create one Parent Entity with some Child Entities and start the Dialog.
Creating and publishing the plug-in
Now we can create a plug-in which will fire on Parent Entity Update and process the customers’ invoices.
Create a new plug-in project in Visual Studio. Generate the data model of your CRM organization using CrmSvcUtil.exe (see here). Use the following command line with your credentials and CRM URL:
CrmSvcUtil /url:https://article0808.crm4.dynamics.com/XRMServices/2011/Organization.svc /out:Xrm.cs /username:”[email protected]” /password:”adminadmin” /namespace:Xrm /serviceContextName:PluginServiceContext
Add the generated file to the project.
Create a new ProcessCustomersPlugin class and inherit it from Plugin class.
Here’s code from this class:
using System;
using System.Linq;
using System.Text;

using Microsoft.Xrm.Sdk;
using Microsoft.Xrm.Sdk.Client;

using Xrm;

namespace ProcessMultipleRecords
{
    /// <summary>
    /// Process customers' invoices plugin
    /// </summary>
    public class ProcessCustomersPlugin : Plugin
    {
        /// <summary>
        /// Post operation pipeline stage.
        /// </summary>
        private const int PostOperationPipelineStage = 40;

        /// <summary>
        /// Create event name.
        /// </summary>
        private const string UpdateEventName = "Update";

        /// <summary>
        /// Assign customers to billing run trigger CRM name.
        /// </summary>
        private const string ParentEntityLogicalName = "ar_parententity";

        /// <summary>
        /// Initializes a new instance of the <see cref="ProcessCustomersPlugin"/> class.
        /// </summary>
        public ProcessCustomersPlugin()
            : base(typeof(ProcessCustomersPlugin))
        {
            this.RegisteredEvents.Add(
                new Tuple<int, string, string, Action<LocalPluginContext>>(
                    PostOperationPipelineStage, UpdateEventName, ParentEntityLogicalName, this.ExecuteProcessCustomers));
        }

        /// <summary>
        /// Executes customers processing.
        /// </summary>
        /// <param name="localPluginContext">
        /// The local plugin context.
        /// </param>
        private void ExecuteProcessCustomers(LocalPluginContext localPluginContext)
        {
            if (localPluginContext == null)
            {
                throw new ArgumentNullException("localPluginContext");
            }

            // Getting trigger entity
            ar_parententity trigger;
            if (localPluginContext.PluginExecutionContext.InputParameters != null
                && localPluginContext.PluginExecutionContext.InputParameters.Contains("Target")
                && localPluginContext.PluginExecutionContext.InputParameters["Target"] is Entity)
            {
                var entity = (Entity)localPluginContext.PluginExecutionContext.InputParameters["Target"];
                if (!entity.LogicalName.Equals(ar_parententity.EntityLogicalName))
                {
                    throw new ArgumentException("Plugin execution failure. Can not retrieve required reading.");
                }

                trigger = entity.ToEntity<ar_parententity>();
            }
            else
            {
                throw new ArgumentException("Plugin execution failure. Can not retrieve required reading.");
            }

            this.ProcessCustomers(trigger, localPluginContext);
        }

        /// <summary>
        /// Processes invoces connected to customers.
        /// </summary>
        /// <param name="trigger">
        /// The trigger with amount value.
        /// </param>
        /// <param name="localPluginContext">
        /// The local plugin context.
        /// </param>
        private void ProcessCustomers(ar_parententity trigger, LocalPluginContext localPluginContext)
        {
            using (var context = new PluginServiceContext(localPluginContext.OrganizationService))
            {
                // Getting Child Entities
                var triggerChildrens = context.ar_childentitySet.Where(x => x.ar_ParentEntity.Id == trigger.Id);
                foreach (var triggerChildren in triggerChildrens)
                {
                    // Getting customers from Child Entitites
                    var customer = context.ContactSet.FirstOrDefault(x => x.Id == triggerChildren.ar_Customer.Id);
                    if (customer != null)
                    {
                        // Getting invoices
                        var invoices =
                            context.InvoiceSet.Where(
                                x => x.CustomerId.Id == customer.Id && x.StateCode == InvoiceState.Active);
                        foreach (var invoice in invoices)
                        {
                            // Updating invoices
                            invoice.DiscountAmount =
                                new Money(
                                    (invoice.DiscountAmount ?? new Money(0)).Value
                                    + (trigger.ar_Amount ?? new Money(0)).Value);
                            context.UpdateObject(invoice);
                        }
                    }
                }

                // Saving all changes
                var results = context.SaveChanges(SaveChangesOptions.ContinueOnError);
                if (results.HasError)
                {
                    var sb = new StringBuilder();
                    foreach (var result in results)
                    {
                        if (result.Error != null)
                        {
                            sb.AppendFormat("{0}\n", result.Error.Message);
                        }
                    }

                    throw new InvalidOperationException(sb.ToString());
                }
            }
        }
    }
}
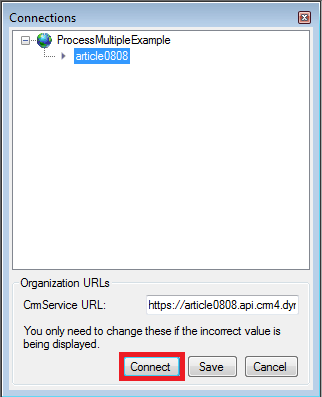
Sign the assembly with a key file and build it. Now we can register plug-in using the Plug-in Registration Tool. Go to your Developer Tool Kit installation folder, then to sdk\bin and run pluginregistration executable. Click the Create New Connection button, fill in the form and click Connect. For more info about discovery, see URL.
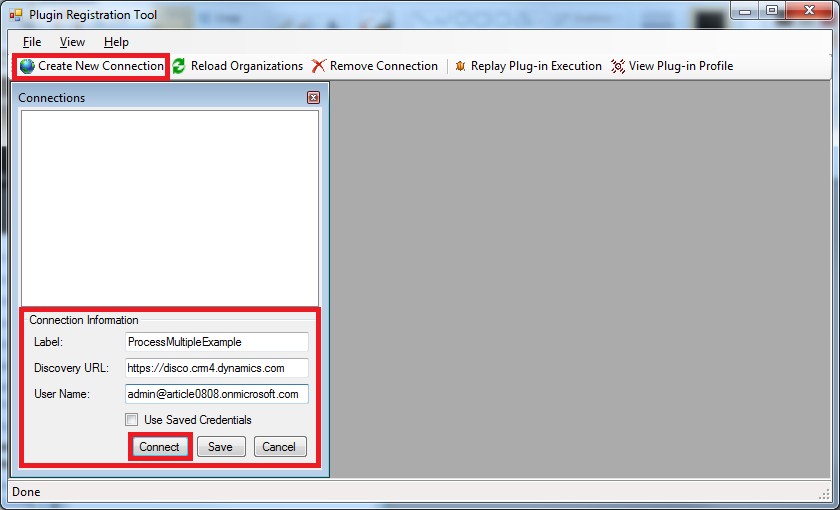
After that enter the password and click Connect in Organization URLs panel:
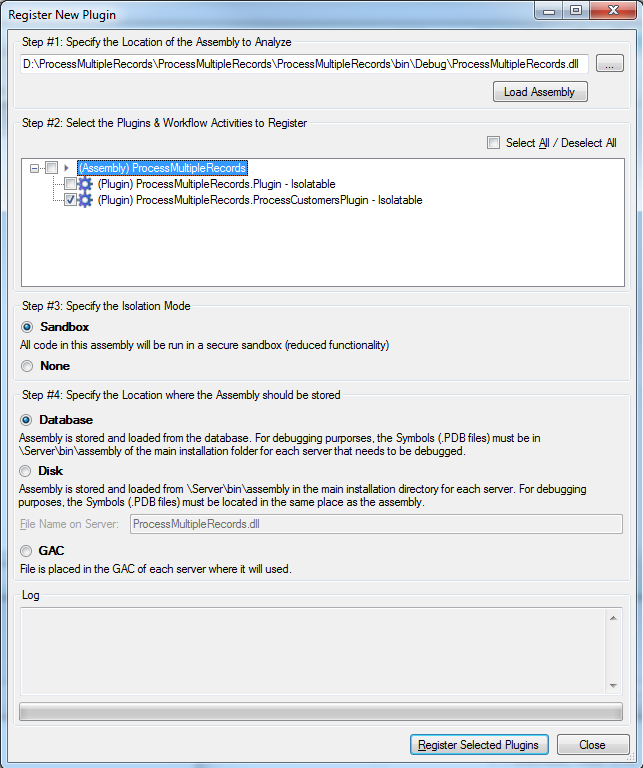
The system will load all present assemblies and messages. Click Register->Register New Assembly:

In the Register New Plugin dialogue specify the location of the assembly, select the required plugin and clickRegister Selected Plugins.
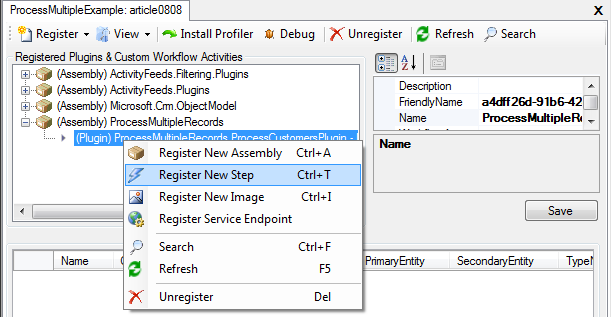
Then in Organization tab expand the uploaded assembly, right-click on the plug-in and select Register New Step in the context menu.
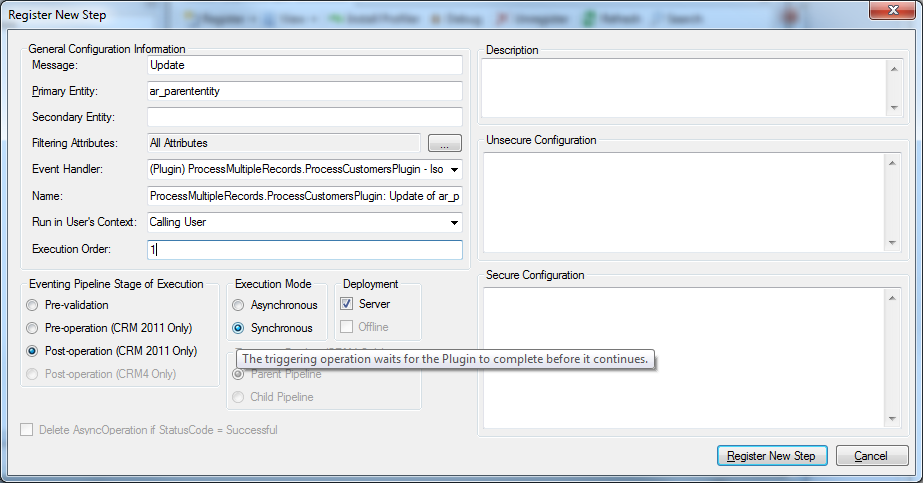
Fill in the dialogue fields as shown in the picture below and click Register New Step
Demonstration
OK, now we are ready to run processing over some customers, create invoices for them and add some items to these invoices. Invoices can be of two types: with the applied discount, or without the discount, and our code will handle the empty values. Go to Sales->Customers->Contacts section, select some customers including the ones that we have created invoices for and hit the Process Invoices button.
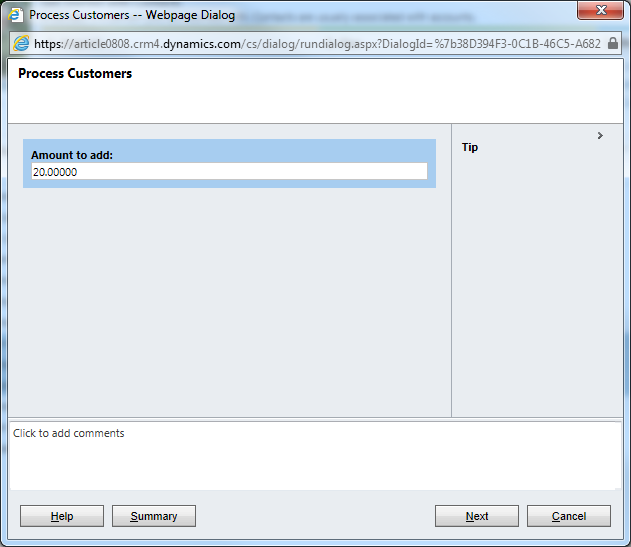
In the dialogue enter the value for the amount to add to customer’s discount, click Next and then Finish. Now we can check our invoices. As you can see, the discount amount increased by the values we entered in dialogues.
You can found many other cases when we can apply this approach of implementing complex logic in Microsoft Dynamics CRM. Thanks for reading!


.NET Development
Don’t underestimate the power of the right technology that the right .NET development company


